在常见缓存更新策略 中,有简单提出了主动更新,有一种策略是:缓存与数据库整合一个服务,由服务来维护一致性。常见的服务有canal等等,其他的我也没接触过。
canal
阿里巴巴旗下的开源项目,地址:canal
它的原理是: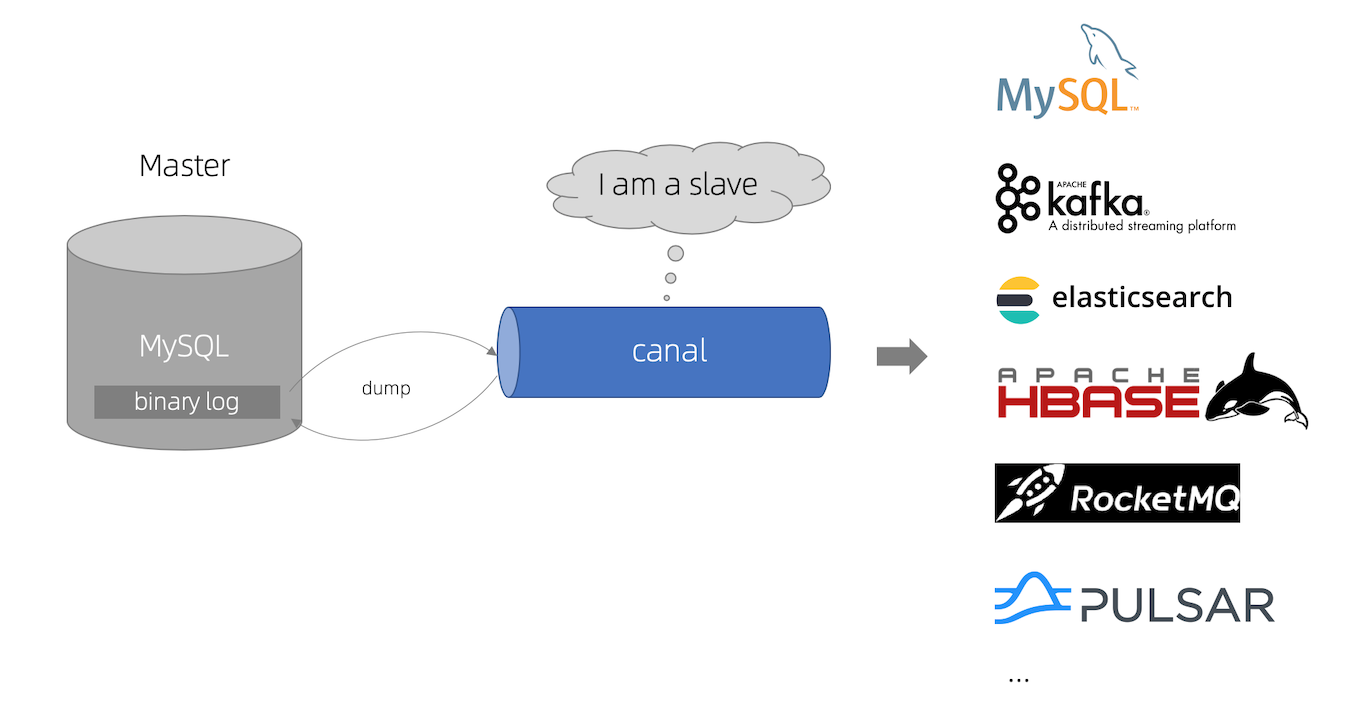
原理
要了解canal的原理,首先要熟悉mysql的主从复制,如不熟悉,请移步 mysql之日志、主从复制
如上图,我们的canal就是模拟自己是mysql的一个slave节点,然后从中获取binlog日志,因为所有的DDL和DML,都会存在于binlog日志中。而canal获取到之后解析。
- canal 模拟 MySQL slave 的交互协议,伪装自己为 MySQL slave ,向 MySQL master 发送dump 协议
- MySQL master 收到 dump 请求,开始推送 binary log 给 slave (即 canal )
- canal 解析 binary log 对象(原始为 byte 流)
canal解析同步redis
如下图: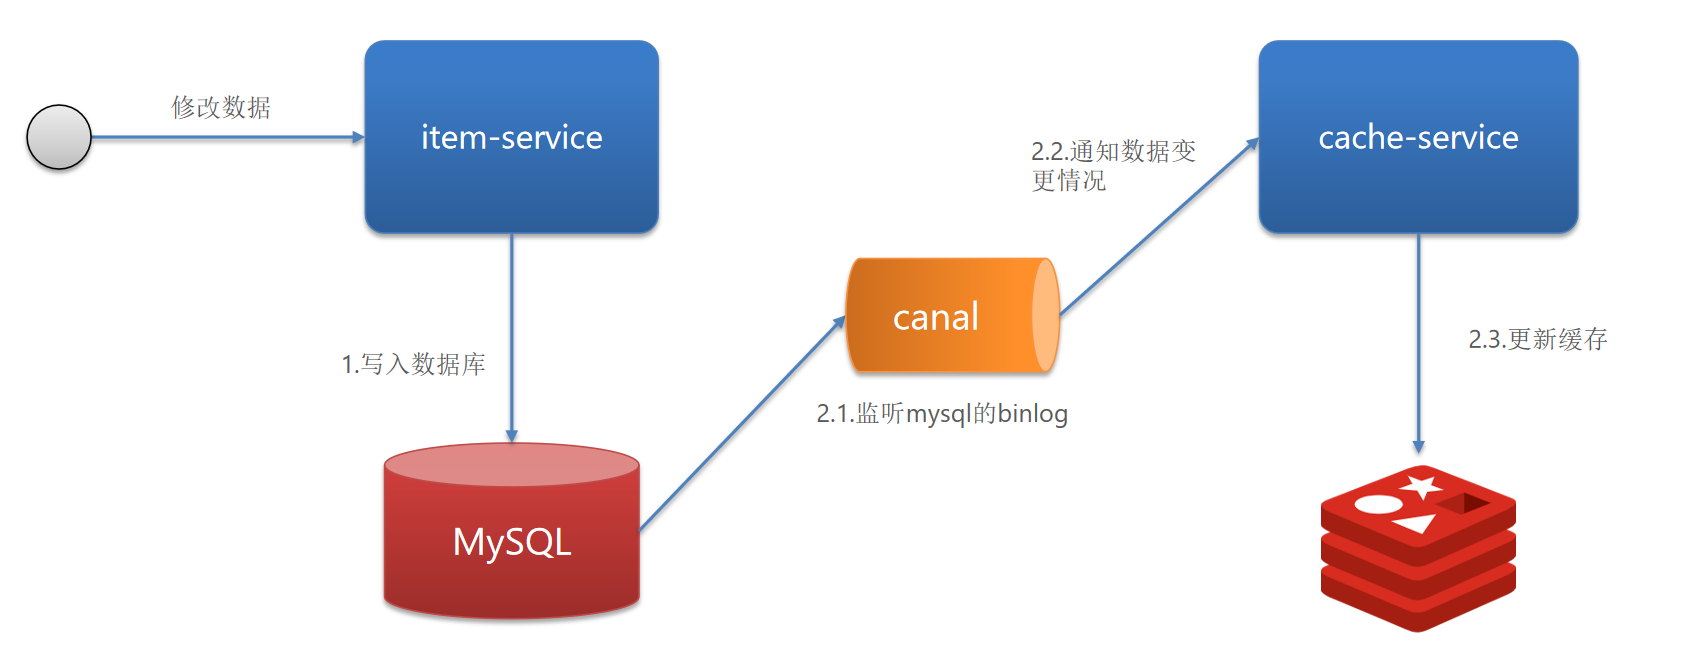
我们在修改数据后,业务逻辑不用主动更新缓存,我们通过canal来解析binlog,拿到对应数据后,更新缓存。
环境搭建
- mysql环境。
- 创建study库、tb_user表。
- 创建用户用于从库同步
create user canal@'%' IDENTIFIED by '123456';
GRANT SELECT, REPLICATION SLAVE, REPLICATION CLIENT,SUPER ON *.* TO 'canal'@'%' identified by '123456';
FLUSH PRIVILEGES;
修改mysql的binlog的格式为row,不然获取到的是sql语句没啥用。安装canal
通过docker安装并查看启动状态:
[root@VM-4-9-centos data]# docker pull canal/canal-server:v1.1.5
[root@VM-4-9-centos data]# docker run -p 11111:11111 --name canal \
> -e canal.destinations=study \
> -e canal.instance.master.address=124.223.47.250:3306  \
> -e canal.instance.dbUsername=canal  \
> -e canal.instance.dbPassword=123456  \
> -e canal.instance.connectionCharset=UTF-8 \
> -e canal.instance.tsdb.enable=true \
> -e canal.instance.gtidon=false  \
> -e canal.instance.filter.regex=.* \
> -d canal/canal-server:v1.1.5
4ad6168eed1ebcb50f4647c52f4e16d2f09e3cf4c576a7bbaeefcc70e7d33e1b
[root@VM-4-9-centos data]# docker ps
CONTAINER ID   IMAGE                       COMMAND                  CREATED         STATUS         PORTS                                                                           NAMES
4ad6168eed1e   canal/canal-server:v1.1.5   "/alidata/bin/main.s…"   2 seconds ago   Up 2 seconds   9100/tcp, 11110/tcp, 11112/tcp, 0.0.0.0:11111->11111/tcp, :::11111->11111/tcp   canal

[root@VM-4-9-centos data]# docker logs -f canal
DOCKER_DEPLOY_TYPE=VM
==> INIT /alidata/init/02init-sshd.sh
==> EXIT CODE: 0
==> INIT /alidata/init/fix-hosts.py
==> EXIT CODE: 0
==> INIT DEFAULT
Generating SSH1 RSA host key: [  OK  ]
Starting sshd: [  OK  ]
Starting crond: [  OK  ]
==> INIT DONE
==> RUN /home/admin/app.sh
==> START ...
start canal ...
start canal successful
==> START SUCCESSFUL ...
说明:
-p 11111:11111:这是canal的默认监听端口-e canal.instance.master.address=mysql:3306:数据库地址和端口,如果不知道mysql容器地址,可以通过docker inspect 容器id来查看-e canal.instance.dbUsername=canal:数据库用户名-e canal.instance.dbPassword=canal:数据库密码-e canal.instance.filter.regex=:要监听的表名称
 其中-e canal.instance.filter.regex:
 mysql 数据解析关注的表,Perl正则表达式.
 多个正则之间以逗号(,)分隔,转义符需要双斜杠(\\)
 常见例子:
 1.  所有表:.*   or  .*\\..*
 2.  canal schema下所有表: canal\\..*
 3.  canal下的以canal打头的表:canal\\.canal.*
 4.  canal schema下的一张表:canal.test1
 5.  多个规则组合使用然后以逗号隔开:canal\\..*,mysql.test1,mysql.test2
在 容器里面/home/admin/canal-server/logs/study路径下,也有日志如:
[root@ce4d03d0f19d study]# cat study.log
2023-10-13 18:54:03.418 [main] INFO  c.a.otter.canal.instance.spring.CanalInstanceWithSpring - start CannalInstance for 1-study
2023-10-13 18:54:03.430 [main] WARN  c.a.o.canal.parse.inbound.mysql.dbsync.LogEventConvert - --> init table filter : ^.*$
2023-10-13 18:54:03.431 [main] WARN  c.a.o.canal.parse.inbound.mysql.dbsync.LogEventConvert - --> init table black filter : ^mysql\.slave_.*$
2023-10-13 18:54:03.436 [main] INFO  c.a.otter.canal.instance.core.AbstractCanalInstance - start successful....
2023-10-13 18:54:03.571 [destination = study , address = /124.223.47.250:3306 , EventParser] WARN  c.a.o.c.p.inbound.mysql.rds.RdsBinlogEventParserProxy - ---> begin to find start position, it will be long time for reset or first position
2023-10-13 18:54:03.572 [destination = study , address = /124.223.47.250:3306 , EventParser] WARN  c.a.o.c.p.inbound.mysql.rds.RdsBinlogEventParserProxy - prepare to find start position just show master status
2023-10-13 18:54:10.600 [destination = study , address = /124.223.47.250:3306 , EventParser] WARN  c.a.o.c.p.inbound.mysql.rds.RdsBinlogEventParserProxy - ---> find start position successfully, EntryPosition[included=false,journalName=mysql-bin.000002,position=2942697,serverId=1,gtid=,timestamp=1697191587000] cost : 7016ms , the next step is binlog dump
如果有问题,请根据日志进行修改。
使用go客户端进行连接
用到了第三方的库 canal-go
好像alibaba没有提供官方的go例子,也好久没更新了,这个项目是咋啦....
import (
    "fmt"
    "log"
    "os"
    "time"

    "github.com/golang/protobuf/proto"
    "github.com/withlin/canal-go/client"
    pbe "github.com/withlin/canal-go/protocol/entry"
)

func main() {
    connector := client.NewSimpleCanalConnector("124.223.47.250", 11111, "canal", "123456", "study", 60000, 60*60*1000)
    err := connector.Connect()
    if err != nil {
        log.Println(err)
        os.Exit(1)
    }
    err = connector.Subscribe(".*\\..*")
    if err != nil {
        log.Println(err)
        os.Exit(1)
    }

    for {
        message, err := connector.Get(100, nil, nil)
        if err != nil {
            log.Println(err)
            os.Exit(1)
        }
        batchId := message.Id
        if batchId == -1 || len(message.Entries) <= 0 {
            time.Sleep(300 * time.Millisecond)
            //fmt.Println("===没有数据了===")
            continue
        }
        printEntry(message.Entries)
    }
}

func printEntry(entrys []pbe.Entry) {
    for _, entry := range entrys {
        if entry.GetEntryType() == pbe.EntryType_TRANSACTIONBEGIN || entry.GetEntryType() == pbe.EntryType_TRANSACTIONEND {
            continue
        }
        rowChange := new(pbe.RowChange)

        err := proto.Unmarshal(entry.GetStoreValue(), rowChange)
        checkError(err)
        if rowChange != nil {
            eventType := rowChange.GetEventType()
            header := entry.GetHeader()
            fmt.Println(fmt.Sprintf("================> binlog[%s : %d],name[%s,%s], eventType: %s", header.GetLogfileName(), header.GetLogfileOffset(), header.GetSchemaName(), header.GetTableName(), header.GetEventType()))

            for _, rowData := range rowChange.GetRowDatas() {
                if eventType == pbe.EventType_DELETE {
                    printColumn(rowData.GetBeforeColumns())
                } else if eventType == pbe.EventType_INSERT {
                    printColumn(rowData.GetAfterColumns())
                } else {
                    fmt.Println("-------> before")
                    printColumn(rowData.GetBeforeColumns())
                    fmt.Println("-------> after")
                    printColumn(rowData.GetAfterColumns())
                }
            }
        }
    }
}

func printColumn(columns []*pbe.Column) {
    for _, col := range columns {
        fmt.Println(fmt.Sprintf("%s : %s  update= %t", col.GetName(), col.GetValue(), col.GetUpdated()))
    }
}

func checkError(err error) {
    if err != nil {
        fmt.Fprintf(os.Stderr, "Fatal error: %s", err.Error())
        os.Exit(1)
    }
}
修改了tb_user表,id为7的数据,邮箱改了一下,输出日志:
================> binlog[mysql-bin.000003 : 264412],name[study,tb_user], eventType: UPDATE
-------> before
id : 7  update= false
name : 用户7  update= false
email : 414704552@qq.com  update= false
phone : +8613570246382  update= false
gender : 0  update= false
password : pwd274343423  update= false
age : 14  update= false
class : 51  update= false
card : 431028199075045255  update= false
create_time : 2023-09-18 17:50:36  update= false
update_time : 2023-10-13 22:17:37  update= false
-------> after
id : 7  update= false
name : 用户7  update= false
email : 41470455@qq.com  update= true
phone : +8613570246382  update= false
gender : 0  update= false
password : pwd274343423  update= false
age : 14  update= false
class : 51  update= false
card : 431028199075045255  update= false
email : 41470455@qq.com  update= false
phone : +8613570246382  update= false
gender : 0  update= false
password : pwd274343423  update= false
age : 14  update= false
class : 51  update= false
card : 431028199075045255  update= false
create_time : 2023-09-18 17:50:36  update= false
update_time : 2023-10-13 22:25:08  update= false
由此我们可以看到,把before之前和之后的全部给输出了,其实我们只需要关系之后的,然后根据id把所有的数据存入redis即可。